
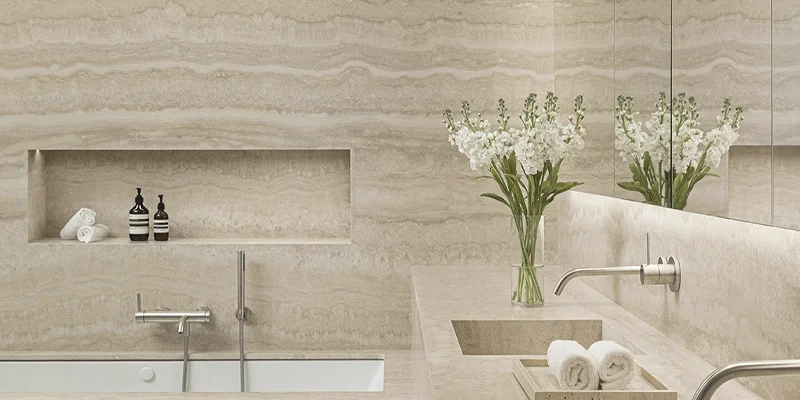
A stone shower niche installation succeeds only when the recessed wall assembly, waterproofing system, fabricated stone and surrounding tile are planned as connected components. A precisely cut quartz or natural-stone shelf cannot compensate for weak framing, a damaged membrane or an opening that was measured at the wrong stage.
The visible stone is a finish. Water management takes place through the complete shower assembly behind and around it. Corners, transitions, penetrations, shelf support and installation sequence must therefore be resolved before the niche is covered.
This guide explains how the contractor, waterproofing installer, tile installer and stone fabricator should coordinate their work, what must be inspected before fabrication and how joints and drainage details affect long-term performance.
Quick answer: A stone shower niche should be framed securely, integrated into a compatible waterproofing system and inspected before the decorative stone is installed. Quartz, porcelain or natural stone does not replace the membrane behind the niche. Joint type, shelf support, setting materials and drainage details must follow the selected shower system and material requirements.
Table of Contents
Several trades may contribute to one completed niche. Problems occur when responsibilities are assumed rather than assigned. Before work begins, the project should identify who prepares the wall, who completes the waterproofing, who measures and fabricates the stone, and who finishes the transitions to the surrounding tile.
The contractor responsible for the wall should confirm that the opening is properly supported and does not interfere with structural framing, plumbing, electrical components or required insulation. A wide horizontal niche may require more framing work than a compact opening contained within one stud bay.
The wall preparation stage should establish:
Stone components should not be used to brace a loose enclosure or correct structural movement. The niche must already be stable before waterproofing and finish materials are applied.
The waterproofing installer is responsible for integrating the niche with the surrounding shower system. That may involve a prefabricated waterproof enclosure, waterproof building panels, sheet membrane, liquid-applied membrane or another approved system.
The correct method depends on the products selected for the project. Mixing individual components from different systems without confirming compatibility may affect adhesion, detailing and warranty coverage.
Waterproofing responsibility includes more than coating the visible inside of the opening. Attention is required at:
The completed waterproofing should be inspected at the stage required by the selected system and project specification. Once stone and tile cover the assembly, hidden defects become significantly more difficult to identify and correct.
The stone fabricator is responsible for producing the approved sill, shelf, back, returns or frame components. This includes dimensions, exposed-edge finishing, pattern direction and identification of the pieces required for the agreed installation sequence.
The finish installer must place those components without damaging the prepared enclosure and must use setting and joint materials suitable for the quartz, porcelain, natural stone, adjacent tile and waterproofing assembly.
The exact division of work varies by project. In some installations, the tile contractor sets the fabricated stone; in others, the stone installer completes specific components. The scope should be recorded before measurement so no shelf, return or perimeter joint is omitted.
Responsibility rule: Assign one named party to each stage—framing, waterproofing, measurement, fabrication, stone setting, tile transitions and final flexible joints. “The other installer will handle it” is not an installation plan.
Stone, quartz and porcelain may resist water at their exposed surfaces, but the complete niche still contains corners, joints and transitions. The assembly behind the finish must manage moisture even when water reaches those locations.
A prefabricated niche is manufactured as a ready-to-integrate enclosure. Depending on the system, it may include a waterproof coating, integrated flange or accessories for connecting it to the surrounding membrane.
A site-built niche is formed from approved substrate and waterproofing components. It offers greater flexibility in size and shape but creates more corners and transitions that must be detailed correctly.
| Niche Type | Main Advantage | Critical Installation Check |
|---|---|---|
| Prefabricated enclosure | Controlled factory shape with a defined integration method | Perimeter connection to the surrounding waterproof wall system |
| Site-built niche | Custom dimensions and shelf layout | Continuous treatment of every corner, joint and transition |
| Furred-wall niche | Can create depth without recessing into a constrained wall | Stable framing and integration with the complete shower assembly |
The waterproof layer should continue from the shower wall into and around the niche according to the selected system. Corners and the perimeter opening require particular attention because they concentrate multiple changes of direction in a small area.
Membrane pieces, preformed corners, bands or liquid-applied products must be installed with the overlaps, thicknesses and curing conditions specified by their manufacturer. More material is not automatically better; excessive buildup can make the opening uneven and affect the fit of fabricated stone.
Before stone measurement, check that:
Accidental cuts, screw holes or other damage to the waterproof surface should be repaired using the approved method for that system before finish installation. Covering a damaged area with stone, mortar or sealant does not automatically restore the original waterproofing performance.
Likewise, adhesives, mortars, primers and sealants should be selected as a compatible group. A product suitable for bonding tile may not be appropriate for every resin-backed stone, engineered quartz or non-absorbent porcelain component.
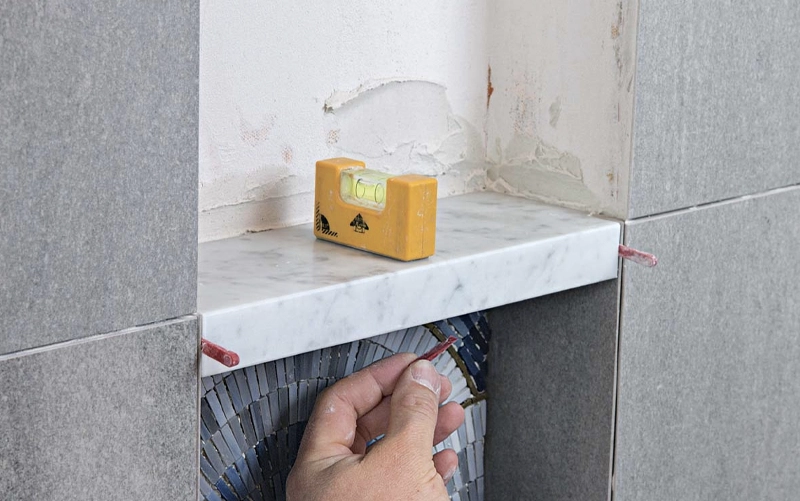
The appropriate measurement stage depends on the selected installation sequence. Fabrication from rough framing alone may be inaccurate if substrate, membrane and setting-material buildup have not been controlled.
Before measuring, the contractor and fabricator should confirm:
If the opening changes after final measurement, the fabricator must be informed before cutting. Small field modifications can alter exposed edges, vein alignment and shelf support.
A clear component schedule should identify the back panel, sill, top, side returns, shelf and any exterior frame pieces. Each component should include its edge finish, visible surfaces, pattern direction and intended installation order.
For strongly patterned material, a labelled dry layout or fabrication drawing can help the installers preserve the approved orientation. Documentation is especially important when the stone and tile are installed by different crews.
Handoff checkpoint: Do not release the stone for fabrication until the measurement stage, component list, exposed edges, shelf support and installation sequence have been accepted by the responsible trades.
A stone shower niche contains several changes of plane within a compact area. The back meets the sides, the sides meet the sill and top, and the completed niche connects to the surrounding shower wall. These locations do not all behave like flat joints in the middle of one tiled surface.
Joint planning should be completed before fabrication because the selected detail affects stone dimensions, installation tolerances and the amount of visible sealant or grout around each component.
Grout fills joints within appropriate tiled or stone surfaces, but it is rigid after curing. Changes of plane and transitions between different materials may require movement accommodation through a compatible flexible sealant or an approved movement-joint profile.
The correct treatment should follow the selected shower system, installation-material manufacturer and project specification. A joint should not be filled with grout merely because grout visually matches the surrounding wall.
Flexible joints may be required where:
This does not mean every visible line automatically receives the same sealant. Joint location, movement requirements, material compatibility and manufacturer instructions must be reviewed for the complete assembly.
Quartz, porcelain, natural stone and ceramic tile can differ in thickness, edge finish, absorption and dimensional behaviour. Their meeting point should be planned as a transition rather than forced into an inconsistent gap.
The fabricator and tile installer should agree on:
A joint that narrows to nothing at one end and widens at the other usually indicates an opening, template or installation problem. Sealant should not be used to conceal major dimensional inaccuracies.
Joint width should provide enough space for the specified material to be installed and perform as intended. Extremely tight joints may not accept the required sealant profile, while unnecessarily wide joints can become visually dominant and harder to finish consistently.
The selected sealant should be compatible with:
Some sealants can stain or discolour sensitive natural stones. Others may not adhere correctly to certain non-absorbent surfaces without the preparation specified by the manufacturer. Product suitability should be confirmed before application, not after a test joint fails.
Joint-planning rule: A colour-matched product is not automatically a technically compatible product.










A shower niche will be exposed to water droplets, spray, steam and wet containers. Its geometry should avoid creating unintended pockets where water remains trapped behind a raised edge or against a poorly aligned joint.
Shower floors and benches have defined drainage requirements, but niche shelves are not detailed identically by every manufacturer. Some systems permit or recommend raising the rear of a shelf to encourage water to move outward. Other purpose-designed niche products use a level storage surface so bottles remain stable.
For that reason, the article should not assign one universal percentage or angle to every stone niche. The correct detail depends on:
The objective is to avoid a finished assembly that directs water toward the back wall or traps it behind a raised front edge. The drainage detail should be established in the substrate and setting process rather than improvised by grinding the finished stone on site.
Even when a shelf surface is correctly positioned, a proud tile edge, thick sealant bead or projecting frame can create a small dam. Water may then remain at the perimeter and leave mineral deposits or soap residue.
Review the full cross-section of the niche, including:
A visually thick front edge should not be allowed to rise above the storage surface in a way that obstructs water movement. If a raised profile is part of the design, its effect on cleaning and drainage must be considered before fabrication.
The bottom sill and internal shelves may require different treatment. A bottom sill connects directly to the niche perimeter and often receives more water. An internal shelf may be partially sheltered but creates additional intersections at its sides and back.
For each horizontal component, confirm:

Drainage checkpoint: Review the niche in section, not only from the front. A front elevation can show beautiful alignment while hiding a raised lip, reverse pitch or unsupported shelf.
The setting material must bond the selected stone to the prepared substrate without damaging either surface or interfering with the waterproofing system. Quartz, porcelain, translucent stone, resin-backed material and moisture-sensitive natural stone may require different products or preparation.
Before installation, verify:
A generic adhesive selected only because it is labelled for “tile and stone” may not address the exact combination of surfaces in the niche. Product data and system requirements should guide the choice.
A stone shelf is not a decorative insert held only by a bead around its edges. It requires an approved support method suited to its span, thickness, material and expected use.
Depending on the design, support may be provided through:
The shelf should be designed to hold shower products, not body weight. It must not be treated as a grab bar, step or seat unless a qualified professional has specifically designed and approved it for that load.
Long shelves and narrow fabricated pieces deserve particular care during transport and installation. Impact at a corner or unsupported end can damage the piece even when the quartz or stone performs well after it is fully installed.
The sequence may vary according to the niche design. A back panel may need to be installed before the sides, while a shelf may rely on previously installed side finishes for bearing. Surrounding tile may be installed before or after certain stone components.
Before any setting material is applied, dry-fit the components in the planned order and confirm:
Pieces should not be forced into place. Excessive pressure can damage corners, disturb the waterproofing or leave no practical space for the specified joints.
After dry fitting, remove the pieces carefully and preserve their labelled sequence. Any field adjustment that changes an exposed edge or support condition should be approved before installation continues.
Installation checkpoint: Complete a full dry fit before mixing setting materials. Confirm fit, sequence, support, exposed edges and joints while corrections can still be made without rushing against product working time.
Use this checklist before the niche is covered and again before the shower is placed into service:
Installation should pause when a condition suggests that the niche is not ready to be covered. Finishing over an unresolved defect makes later diagnosis and repair more disruptive.
Warning signs include:
Do not conceal uncertainty: If the waterproofing, support or drainage detail cannot be verified, stop before installing the finish. A larger sealant bead or thicker mortar layer is not a reliable substitute for correcting the underlying condition.
No. Quartz, porcelain and many stones may resist water at their surfaces, but the niche depends on the continuous waterproofing assembly behind the finish. Stone does not replace the membrane, treated corners or connection to the surrounding shower wall.
The approved installation depends on the selected shower system. Cement backer board may provide a suitable substrate in some assemblies, but it should not automatically be treated as the complete waterproofing layer. Follow the specified membrane and installation requirements.
Changes of plane and transitions between different materials may require a compatible flexible joint rather than rigid grout. The correct treatment should follow the installation-system manufacturer and project specification. Do not select the joint material by colour alone.
The detail should prevent water from being directed toward the back or trapped behind a raised front edge. Some niche and shelf systems recommend an outward drainage orientation, while other purpose-designed products use a level storage surface. Follow the requirements of the exact system being installed.
Measure at the construction stage agreed upon by the contractor and fabricator. The dimensions must account for the substrate, waterproofing, setting materials, stone thickness and surrounding tile sequence. Rough framing dimensions alone may not represent the finished opening.
Not automatically. Material composition, backing, absorption, translucency and manufacturer requirements can affect product selection. Confirm compatibility with the exact stone and waterproofing system before installation.
Not unless it has been specifically designed and approved for that purpose. A typical niche shelf is intended for shower products and should not be used as a step, seat or grab point.
First identify whether the cause is surface tension around stored products, a raised front edge, an unsuitable joint or incorrect shelf geometry. Do not assume that adding more sealant will solve the problem. The installer should evaluate the complete detail and correct the actual obstruction or installation issue.
No. Damage should be repaired using the approved method for the installed waterproofing system before stone or tile conceals it. Finish materials and perimeter sealant should not be treated as a membrane repair.
A durable stone shower niche depends on coordination before fabrication and inspection before the assembly is covered. Framing, membrane transitions, joints, drainage geometry and shelf support should all be resolved as part of the complete shower—not handled as separate finishing decisions.
The niche can also be coordinated with custom stone shower jambs to maintain consistent materials, edge profiles and transitions throughout the enclosure.
Coordinate the Niche Before Fabrication
Explore custom stone shower boxes and coordinated shower details for precisely measured and professionally finished bathroom projects.